# Home

Home page of the GraphQL Editor Documentation

What is better than a plain old API? An interactive, visual one, that you can work on easily from your browser. With the new GraphQL Editor, this is now possible for every developer!

![Relation view in the Editor](/files/wl2doXBGoAMYK6O86NfX)

### Keep your schema in the cloud.

Your GraphQL schema is available in the cloud for all your team members. You can play with a fake backend and attach GraphiQL or bind it to the real one.

### Build using blocks

Keep building your schema while being type-safe at the same time! Use our visual editor to create your schema in a much faster and cleaner way.

### Deploy&#x20;

Deploy microservices in TypeScript/Javascript to our GraphQL Editor Shared cloud.

### Document

Automatically generate markdown HTML documentation for your schema.

{% hint style="info" %}
You can also test the newest version of GraphQL Editor at&#x20;

<https://develop.cloud-graphql-editor.pages.dev/>
{% endhint %}


# Getting Started

Learn GraphQL and GraphQL Editor

### Onboardings

Every view in GraphQl Editor has an onboarding tour. It will guide you through all the features and help you with the complicated stuff. If you want to reset onboardings go to Home > Help > Reset onboarding tour.

<figure><img src="/files/pQVPHmOhX5gWE7P7OcfA" alt=""><figcaption><p>Graph view onboarding</p></figcaption></figure>

### Interactive GraphQL Tutorial

A tutorial which shows how to use the **Graph** section of GraphQL Editor and teaches GraphQL itself. To start the tutorial click Home > Help > Interactive GraphQL Tutorial.

### Example projects

Example projects are located in the **explore-projects** workspace. They help understand how to use certain features of GraphQL Editor. Load one up and you'll find filled **API, Microservices, Libraries** and **JS Playground** sections for you to play around with.


# Workspaces

Store your GraphQL Projects inside the GraphQL Editor Cloud.

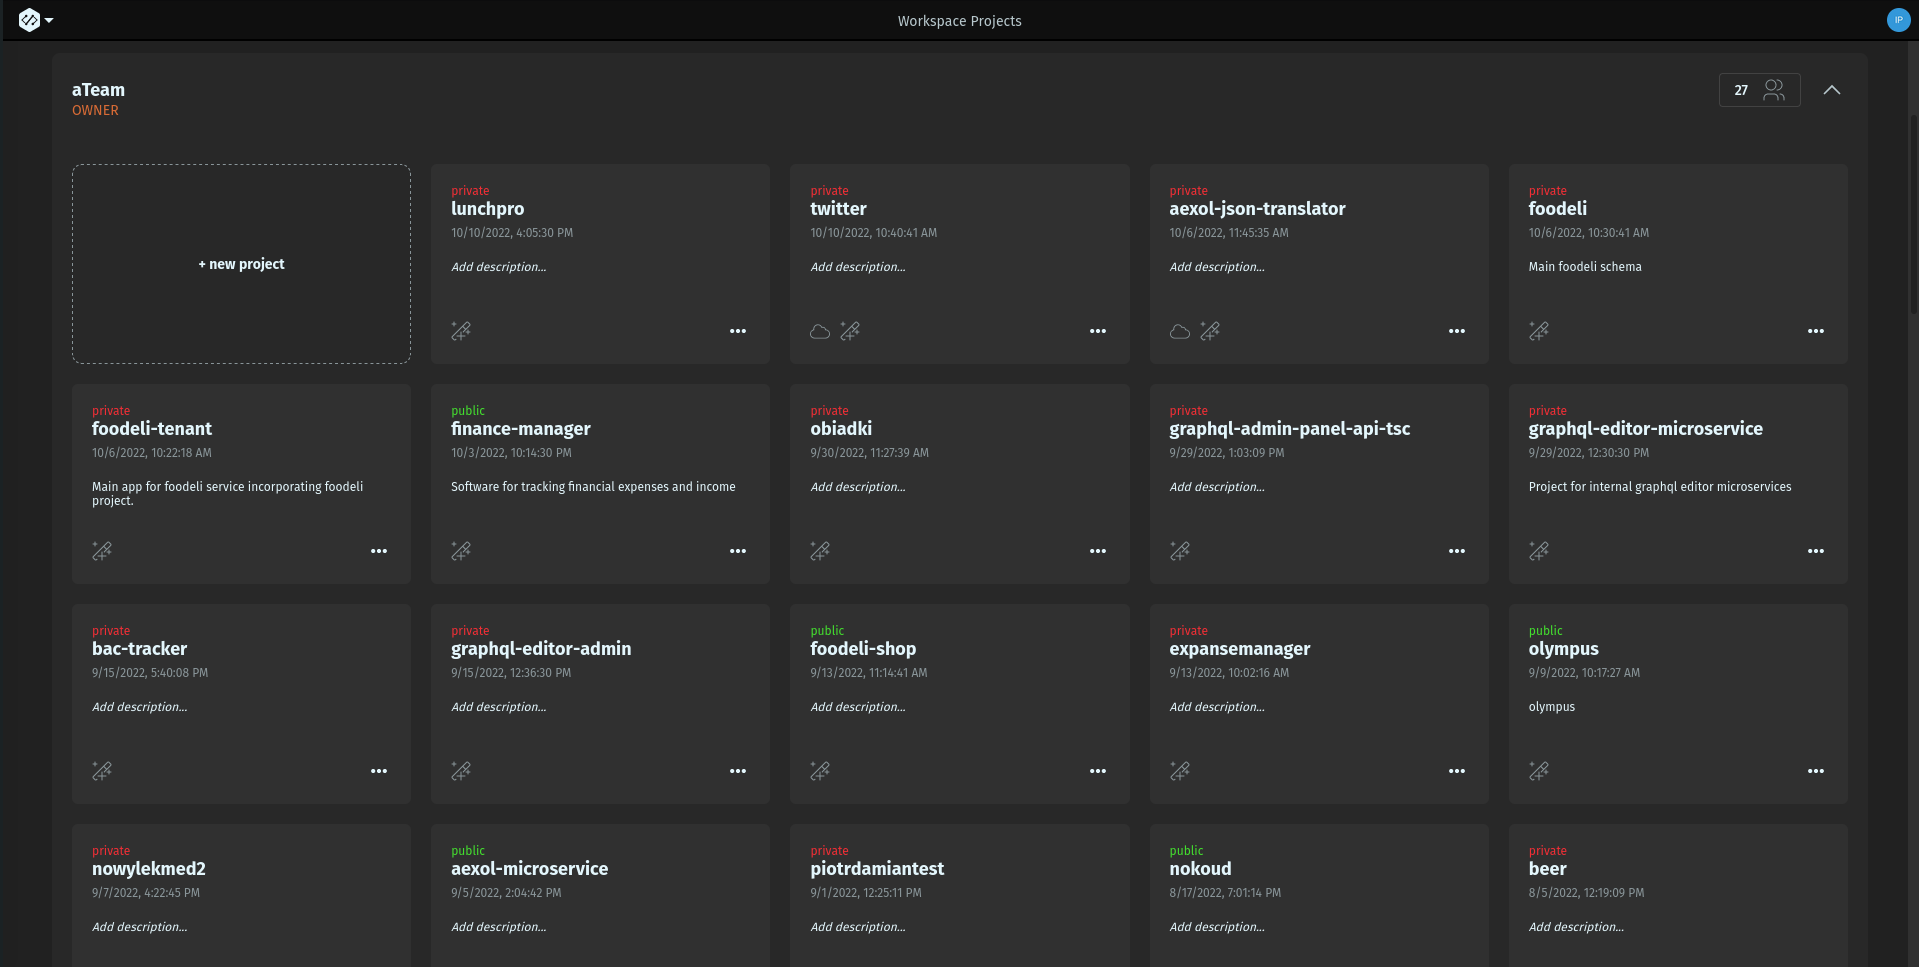
Workspaces are used to organize projects. Each workspace consists of all the workspace members invited to it, and their projects.

<figure><img src="/files/tPzaRbJsUIAmZFlMRFrd" alt=""><figcaption><p>Workspace view</p></figcaption></figure>

### Creating a workspace

To create a workspace click the **Add workspace** button. Insert your unique namespace name and/or invite some members.

### Member roles

* **Owner** - Creator of the workspace. The team owner can add/remove/edit/view projects and members of a team. Only the owner can delete the team.
* **Admin -** can add/remove/edit/view projects and members in a team (except for the owner).
* **Editor** -  can add and edit projects in your team.
* **Viewer** - can view projects in read-only mode, seeing only the **Graph** part of the schema.

### Inviting members

There are 2 ways of inviting members, both are in the **Edit Team** menu:

<figure><img src="/files/beqv8fYOsXweuHM2RWWE" alt=""><figcaption></figcaption></figure>

#### By email

Type in the email of the user you want to invite. It doesn't matter if they have a GraphQL Editor account. Simply click **Add member** and then set their role.

#### By magic link

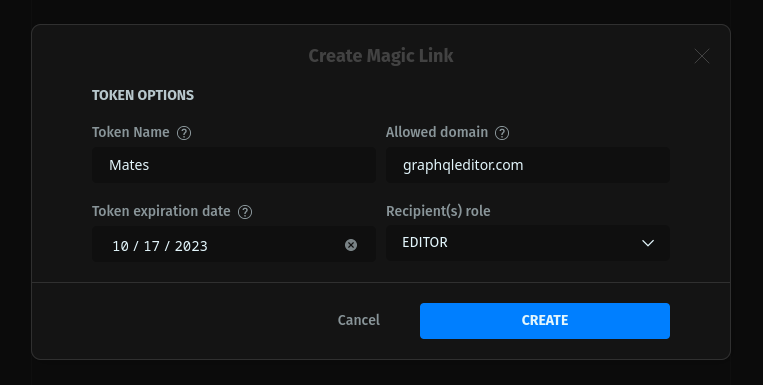
Click **Magic links** in the **Edit Team** menu. Click **Create Magic Link,** set the allowed domain, expiration date and the role you want to assign the recipient. Then share it with them and as soon as they click it they will be on the team.

<figure><img src="/files/SCW7f0tpcHrInp2zRDwJ" alt=""><figcaption></figcaption></figure>


# Projects

GraphQL Projects are stored in the cloud. Each project holds a GraphQL Schema, API Platform, Libraries, Microservices, and JS Playground Data.

### Create a project

To create a project, click the empty tile inside your **Workspace** projects list. It will open a popup with options you can use for your new GraphQL project.\ <br>

#### Connect to GitHub

The project can be connected to your GitHub repo from the very beginning. It will allow you to commit changes to the schema and create Pull Requests from GraphQL Editor.&#x20;

#### Import from URL

GraphQL schema can be downloaded via introspection from your GraphQL Endpoint. Simply enter the URL and credentials, don't worry about CORS as the editor handles it via the backend Proxy.

Connecting to GitHub and importing from URL can also be done at any point later in the project.&#x20;

#### I want to use

In this section, you can attach directive sets to your project. Each of the technologies listed there works only if the library is attached and you can also add custom libraries.

After setting all the options click **Create Project**.


# Live Collaboration

Collaborate on GraphQL Schema and other files

### Graph

To collaborate with your teammates open the same project.  When you are inside the **Graph** menu and edit it, the schema is autosaved every 2 seconds. Everybody who is on the same project can see the changes live.

### API Platform, Microservices, JS Playground and Libraries

For live collaboration in these categories live the live event is sent on every save of a file.


# Keyboard navigation

Just Press CTRL/CMD + K

![quick menu](/files/9u84Z7iRqI6xix5CHp8U)

You can access all navigation commands through the quick Ctrl+K or CMD+K menu. You can use keyboard shortcuts or type the command with text.


# Graph

The main screen in the editor. It represents the project schema in a visual way and consists of 5 different views.

## Views

GraphQL Editor displays schema in 5 Different ways:

#### Creator

Create GraphQL nodes using the visual editor. This view enables creating and editing your GraphQL schema.

#### ERD-like Relation View

This view displays relations between GraphQL nodes. Easily navigate through relations, scalars & enums, use serach and order and easily explore even the largest GraphQL Schema in an simple and transparent way. Relations can also be exported as .png images.

#### Markdown Docs

Auto-generated schema documentation you can display and edit in markdown format.

#### Code

Display and edit the schema as GraphQL code. Navigate through nodes in all views at the same time.

#### Diff & Schema Versioning

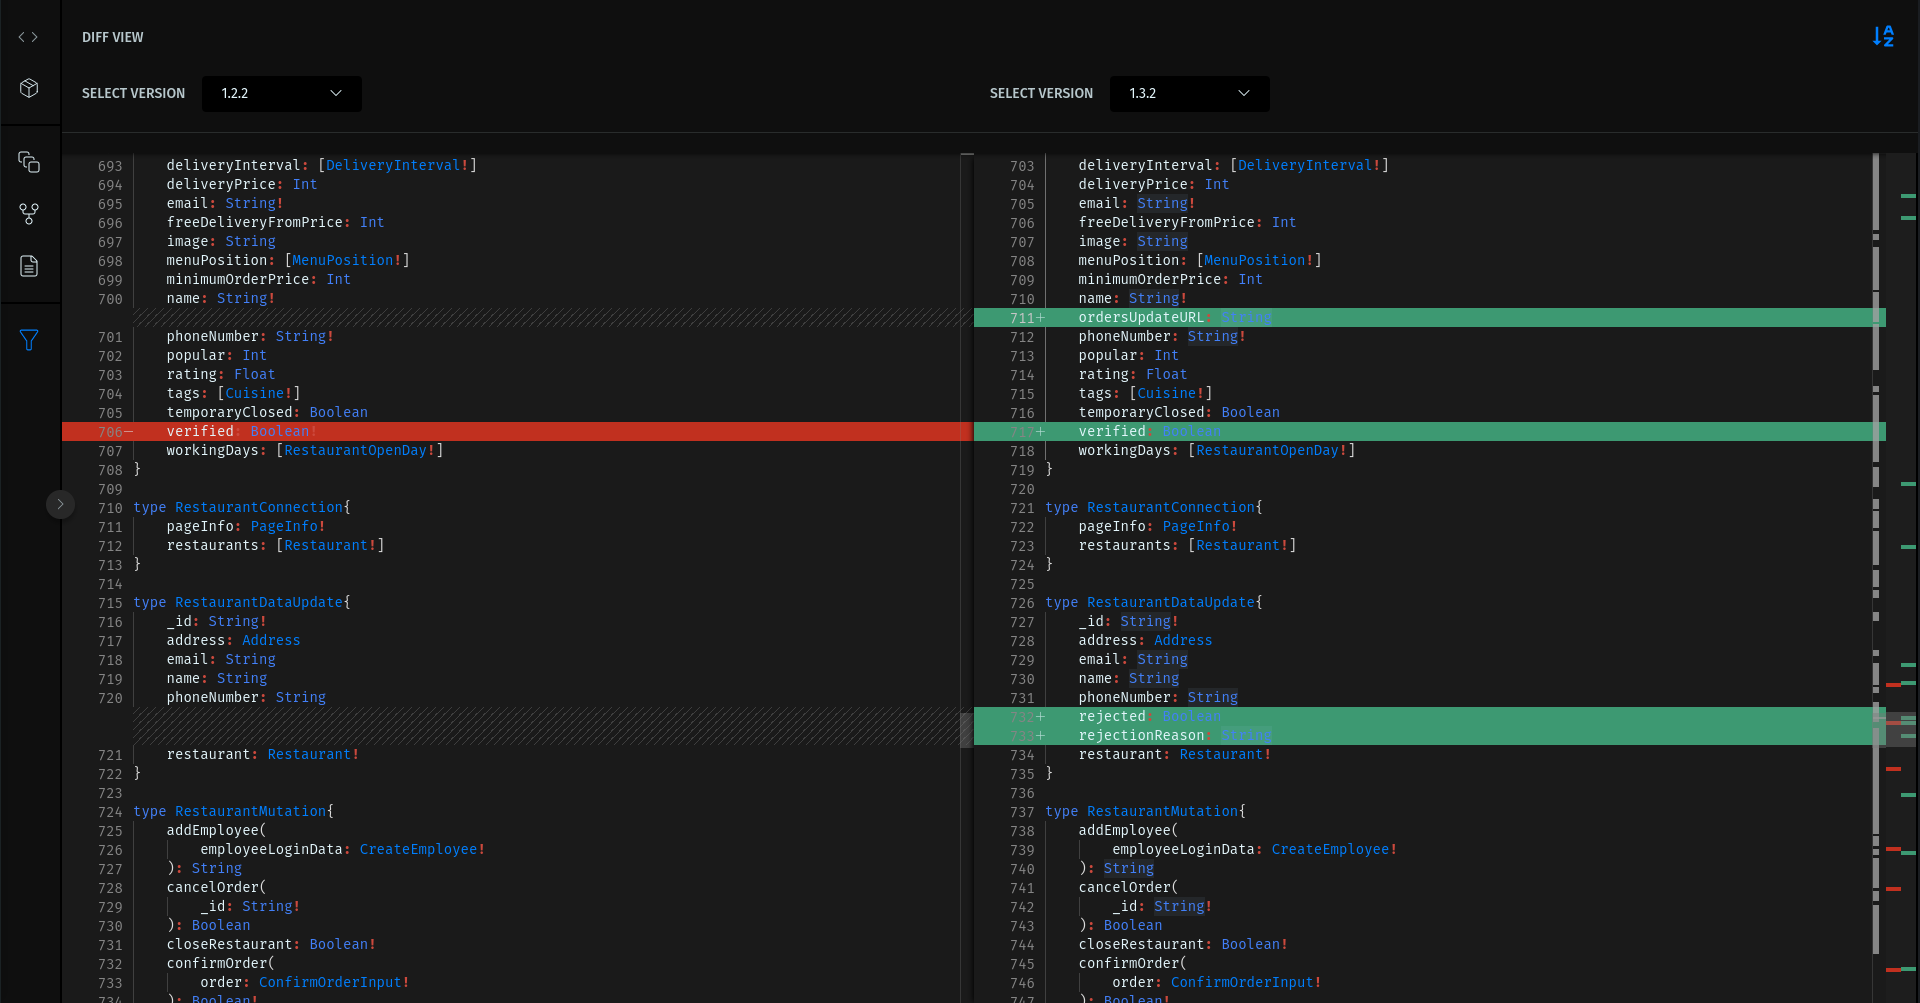
View the differences between schema versions/GitHub commits. Use diff sorting to be 100% precise and see every difference regardless of where it was added in the schema.

\ <br>


# GraphQL Creator

How to create GraphQL nodes and fields

### Create a node ![](/files/mR6STZWx2vOgS5o59IzF)

1. Click new type/input/interface/union/enum/scalar/directive
2. Type in the name of the node
3. Click enter

{% hint style="info" %}
&#x20;Nodes (aside from scalars) need at least one field to be fully created.&#x20;
{% endhint %}

### Change node name ![](/files/GyhCTPxKgS43wlGppdYZ)

1. Select the node
2. Edit its name like a simple text input

### Delete node

To delete a node open the 3 dots menu on top of the active node and click Delete Node:

![](/files/dRMu2OvUlDdgY3ykUBTe)

### Duplicate node

To duplicate node open the 3 dots menu on top of the active node and click Duplicate Node:

![](/files/cMe1AWBwjGMe1cfFvOeg)

### Create a node field

![](/files/KQZ5SR3Ff8d9Z0o9FL8K)

1. Select a node
2. Click the **+** button
3. Type in the name of the field type or select it
4. Click the **+** button or press enter to submit

After that, the node field will be created with a default name (lowercase first letter type name). To change it, just select the created field and edit it like a simple text input.

### List and Non-null type field

![](/files/0ga5u3gpWBDDMyJJW4Sq)

1. Select a node
2. Click **\[!]**
3. Select the desired options&#x20;

### Delete a field

![](/files/rvniqUfjvWLG0mMVNHTS)

1. Select a node
2. Click the 3 dots menu on the desired field.
3. Click Delete

### Implement Interface

![](/files/l4FhROd492gcL7kYYi7u)

1. Select a node
2. Click the **{}** menu
3. Select the desired interface

### Add directive

![](/files/TlbSZMl0pXUB6pvgCICD)

1. Select a node
2. Click the **@** menu
3. Select the desired directive


# ERD like Relation View

How to browse complex GraphQL Schemas

Navigating a big GraphQL Schema with only code is nearly impossible. Instead use our diagram view to see how to browse it in an easy and transparent way.

<figure><img src="/files/ZMSn0szu4tp6g6Hf5OOv" alt=""><figcaption><p>Example ERD relation view exported to .png</p></figcaption></figure>

### Navigation

Navigate through this view, click to center on a node and see all its relations displayed.

### Search & Order

Searching and ordering is available inside the top bar:

<figure><img src="/files/fZ06ygCzOgRYylWxUcVQ" alt=""><figcaption></figcaption></figure>

After searching you will get only the nodes from the search. Ordering is used to switch the order of Type Definitions like `type` `scalar` `interface` `enum` `input` `union`.

### Node options

Additional options are available after selecting a node:

<figure><img src="/files/GDqBVjx7OgPuEfwOueiN" alt=""><figcaption></figcaption></figure>

#### Parent

Display parent relations: show where this node is used. Turn off to only display children relations.

#### Scalars

Display/hide base scalar fields including `String`, `Int`, `Float`, `ID`, `Boolean`.

#### Enums

Expand/hide all enums. Enums can be tricky as the localization enum can consist of hundreds of values.

#### Deselect node

Deselect active node

#### Focus node&#x20;

Scrolls the node to the center of the current view.

#### Export to PNG

Exports current relation nodes to a png file.


# Markdown Docs

How to create docs for your GraphQL Schema

### Browsing the docs

All descriptions inside a schema are rendered with a remark markdown engine. After clicking a type inside the Table of Contents the interface should scroll down to that field in the schema. If you click on the type inside a field in the schema it will also navigate you to the page containing the documentation of the clicked type.

<figure><img src="/files/8o46wkwL7qgByl6NhIIu" alt=""><figcaption></figcaption></figure>

### Editing docs

To edit any field in the docs, click the pencil icon appearing on hover over an element.


# Generate TypeScript library

Generate GraphQL client for your schema in seconds

GraphQL Editor offers an easy way to generate autocomplete JS/TS clients for Browser/Node/React Native. Working with a generated client provides an easy and **type-safe** way for developers to work with their schema. To generate an autocomplete library your schema should  at least have a **root schema Query type.**

To generate a GraphQL Client:

1. Click the Export schema icon
2. Select Export autocomplete libraries

<figure><img src="/files/v0HycYsNhB1NddJ6mZb5" alt=""><figcaption><p>Export option in the menu</p></figcaption></figure>


# Schema versioning

How to properly version your schema

GraphQL Editor lets you deploy multiple versions of your schema. Controlling the process of versioning makes keeping your backend consistent and up-to-date much easier. After the version is deployed the schema and the graph inside become read-only.

To deploy a new version from the schema, open the version menu, and select **Deploy a new version**.

To open a version, open the versions menu and select the desired version.

<figure><img src="/files/7e5CmjjSqwmtg7aoBAHz" alt=""><figcaption></figcaption></figure>

{% hint style="info" %}
You can only edit the latest version
{% endhint %}


# Compare Schema Versions

Use diff display to compare and surgically edit versions of the schema

Comparing versions of GraphQL Schema can be tricky, especially if the code order is changed. Instead of forcing developers to maintain the order of the schema by some linter tools, GraphQL Editor simply compares sorted schema and types to show only the real differences in the code.

<figure><img src="/files/aKocAZJ9e00Wf2NNMmls" alt=""><figcaption><p>Diff editor view</p></figcaption></figure>


# Schema Libraries

The best way to connect GraphQL schemas

Schema libraries allow you to import one schema to another. You cannot see the imported nodes directly in the code editor but you can see them in the Graph view, from where you can inject them into your schema. Imported Graph library nodes are marked with a dashed line.

<figure><img src="/files/1EWAHqReHVNhK7MB1P5y" alt=""><figcaption></figcaption></figure>

Every GraphQL Editor project can act as a library, we just need to cut off the schema keyword. Library nodes are not editable. To edit libraries you should either extend library nodes or edit the library project directly and release a new version.

### Attaching libraries to an existing project

To attach libraries to an existing project click **Libraries** in the top menu, it will take you to the libraries screen.

<figure><img src="/files/S2plEZ1Tdz1vkm9LZQC8" alt=""><figcaption></figcaption></figure>

You can choose one of our common libraries or search your workspaces for libraries to add. To attach a library simply click the **+** button next to it. You can also change the version of the library by using the dropdown menu on the right side of the panel.

{% hint style="success" %}
Remember to press **save changes** when you are done editing!
{% endhint %}


# Cloud

GraphQL Cloud is a set of tools needed to play with your GraphQL API.

### API Platform

The API platform is a tree-based GraphQL query builder. It lets you build queries with just a few simple clicks and input data in easy to navigate user-friendly forms. You can collaborate on all of that LIVE with your team. If you prefer the old way of working just use our **GraphiQL Cloud**.

### Instant Mock Backend

Deploy it in seconds, with just a couple clicks. The mock backend allows you to query your GraphQL Schema and get type-safe responses. If that is not enough you can also configure the method and values for response mocking.

### E2E Tests Builder

Writing tests is a long and boring process, that's why our builder gives you access to click-out E2E tests for your GraphQL backend.

### REST to GraphQL

Still using a REST API? Good because you can use our click-out proxy as a fast and easy way to connect it to your GraphQL project.

{% hint style="warning" %}
Remember. Your schema has to have a root query for GraphQL backends to work
{% endhint %}


# GraphQL API Platform

Tool for building forms and previewing responses of GraphQL resolvers

Our API platform is basically a richer GraphiQL. The concept is the same, but it displays forms for inputs and data in tables. Every query can be saved to the GraphQL Editor Cloud, the same way the project schema is saved.

<figure><img src="/files/k1fsWId27Y1K4mchHINn" alt=""><figcaption><p>response in table format</p></figcaption></figure>

### Adding Parameters

If a query/mutation contains parameters they will be displayed as a form. This form can be customized which provides a better experience to the user than the classical gql console.

<figure><img src="/files/e1ytouXAtVN9TARDWKOP" alt=""><figcaption><p>write in or use dropdown to select parameters</p></figcaption></figure>

### Using widgets

Sometimes the type from GraphQL is not enough to provide the correct field to the user. Widgets provide different form fields for those situations.

<figure><img src="/files/WVDCWo34LDsLh1VhgKtO" alt=""><figcaption><p>use built-in widgets or import them from a library</p></figcaption></figure>

#### Date Widget

This widget provides the date and the datetime inputs formatted to the desired format.

<figure><img src="/files/k7X2LGYZvpXnnkqmbxxi" alt=""><figcaption></figcaption></figure>

#### Password Widget

Same as text but masks the input.

#### Constant Widget

Always provides the same value for the field.

#### Text field Widget

Same as text input, but with a configurable label and placeholder.

#### Text box Widget

Displays `textarea` instead of `input` for strings longer than `input` field.

#### Relation Widget

This widget helps display relations in your schema. If for example, you have to select one of the objects of type **A** in your form but you need to prefetch them you should use a relation widget. For example:

```graphql
type Query{
  itemsByPerson(person: String): [Item!]
  people: [Person!]
}
type Item{
  name: String;
  owner: Person;
}
type Person{
  name: String;
  items: [Item!];
}
```

So for `itemsByPerson` input, you set  `Query.people`as a helper to fetch People to select inside `itemsByPerson`.

#### Autocomplete Widget

Autocomplete widget is better for `String` completions such as map addresses.

#### Upload widget

This widget helps upload the file via the standard S3 way:&#x20;

1. Perform a mutation to receive `putURL` `getURL` params
2. The widget will upload the file to the `putURL`&#x20;
3. It will return the file handle to the text input so it can be added to the object


# Instant Mock backend

Mock backend automatically generated for your GraphQL project

To use and test a fake backend navigate to GraphQL Cloud via the top menu or (CTRL + K). It should automatically deploy your fake backend or warn you if something is incorrect with your schema.&#x20;

This mock backend is deployed out of the box, however it can also be configured. The following options are configurable:

* Faker JS values
* User-defined values. The mock backend will choose a random value/values - for an array from the defined values

<figure><img src="/files/2TXR1C0XqEC0k7xKVkn1" alt=""><figcaption></figcaption></figure>

### Using Faker backend in your frontend apps

To use faker backend inside frontend apps. Please make requests to&#x20;

`https://faker.graphqleditor.com/YOUR_NAMESPACE/YOUR_PROJECT/graphql`


# GraphiQL Cloud

Use and test your GraphQL server. If you don't have one don't worry, you can always use our instant fake backend.

<figure><img src="/files/StKq2lRiff51RVZj2kkp" alt=""><figcaption></figcaption></figure>

### Run operations

To run your GraphQL operations simply choose the operation you want to run and click the Play button to execute.

### Change URL and headers

To change URL and/or headers use the dropdown submenu at the top and add a new endpoint.

### CORS

If you just want to test your API with GraphQL Editor you don't have to worry about CORS. Every request to your GraphQL API is proxied via our service to ensure no CORS issues.

### localhost

You can connect to the API you are serving locally. Just type the localhost URL and it should work with your local backend.


# Endpoint switcher

Our endpoint switcher works for every Cloud tab.

Endpoint switcher lets you provide your own endpoints and headers to query against your schema:

<figure><img src="/files/31u3ol81hjv9fPprJFif" alt=""><figcaption></figcaption></figure>

### Provide Headers

Each endpoint allows the creation of custom headers.

### CORS

You don't have to worry about CORS as all requests go through the GraphQL Editor proxy.


# Rest to GraphQL


# E2E Tests Builder & Runner

Build GraphQL and snapshot E2E tests. Provide a query and/or expected results to have tests run in the browser. After each run you are presented with the results and time of the request execution.

<figure><img src="/files/PQG9jfdCIyJJHdPJj3c1" alt=""><figcaption><p>Running E2E tests</p></figcaption></figure>


# Microservices FaaS

Microservices allow you to deploy back end code to our shared worker infrastructure

Microservices FaaS is a nodeJS service to run microservices inside GraphQL Editor Cloud. All microservices come with **MongoDB Serverless** included in the microservice, so that together with a microservice user also receives a database.

### Getting Started

Shared worker deployments should be used in dev environments or MVP projects. They are limited to **200 requests per minute**. However, you can deploy microservices in your own infrastructure:\
\- All Docker/Kubernetes-based clusters\
\- Azure Functions

#### Dev environment

The GraphQL Editor CLI provides a local environment for your microservices if they live in the microservice cloud, are local or live in the repository. You can to spin up the backend server with one simple command.

#### MVP & PoC projects

GraphQL Editor Microservices combined with our **No-code Resolvers** may be the best option available on the market for building GraphQL backend in the shortest amount of time.


# Resolvers

Define the resolvers for your GraphQL Schema with our no-code & code tool

Build resolvers with GraphQL Editor Integrations and Code.&#x20;

### Building resolvers for GraphQL fields

To build a resolver you can use one of the following options:

* no resolver (usual for scalar types)
* custom resolver, which you can create yourself using the code editor
* one of our built-in integrations

<figure><img src="/files/9hxpO9Wf22t9xpxCnxQW" alt=""><figcaption></figcaption></figure>

Selecting custom resolver will require you to put the correct path to generated TypeScript code or JavaScript code of the resolver.


# Code Editor

Code your backend directly inside the browser

Our code editor for microservices is based on `monaco-editor` with some extra typings support from our typings service. Typings are fetched automagically when they are added inside `package.json`

### Bootstrapped project

By default, the code is bootstrapped. It allows you to start coding custom resolvers much faster. Standard microservice environments consist of `package.json` `tsconfig.json` `src` folder and generated typings for the project.


# Deploy local server

Deploy locally to test your no-code microservice

To start running a local server please refer to the \[[Local server](/tools/untitled/cloud/local-server)]\(/pages/43dBp0sx4wLOETZJrwvG) section of the documentation inside the CLI docs.


# Deploy using GraphQL Editor

Deploy code hosted inside the GraphQL Editor Cloud

You can write small microservices inside the editor microservices Code Tab. It is not a full-featured IDE, however you can create some basic field resolvers there and bind them to serverless functions. It is enough to, for example, write integration code.

Currently microservices can be written in TypeScript and JavaScript. Our editor also supports `package.json` and `tsconfig.json` out of the box. If you have a build script you should provide it during deployment inside the popup dropdown menu.


# Secrets & CORS

Secrets & CORS for your GraphQL Editor Project

### Secrets

You can safely store secrets inside the GraphQL Editor Cloud. To do so, navigate to microservices (CTRL+K, C, M) then Settings (CTRL+K, S) and add & edit secrets there.

### CORS

You can also add allowed origins in the CORS menu inside Settings in the same way as secrets

![](/files/SBYclGq6hoMUAm4f9nTU)

After adding or editing please remember to save changes.


# Logs

Monitor your deployment

### Deployment logs

Deployment logs are visible instantly after a successful deployment.

### Live logs

Live logs are visible always when the service is on.

{% hint style="info" %}
To see logs for your project: navigate to Secrets and check if the environment variable **DEBUG** is set to **1**
{% endhint %}

![](/files/z4hr3P9F59UXvj2PtJKr)


# JS Playground

A visual way to play with data from a GraphQL backend.

You can create fully functional static GraphQL data-driven websites using our JAMStack Tool. The websites are entirely based on your schema and customizable using CSS and JS consoles. You also have an option to preview, export and save your work in a few convenient ways.

<figure><img src="/files/mxSqco98M58TObngwBVI" alt=""><figcaption><p>JS Playground in action</p></figcaption></figure>

### Creating a static page preview

You can immediately start writing the CSS/JS code that will describe how your front-end will look like. If you want to change the endpoint you are calling for this schema (for example to a real backend) just change this function a little bit.

```typescript
import React, { useEffect } from 'https://cdn.skypack.dev/react@17.0.2';
import ReactDOM from 'https://cdn.skypack.dev/react-dom@17.0.2';

const MainComponent: React.FC = ({ children }) => {
    return <div style={{
        background: '#fff',
        padding: 10
    }}>
        <div className="is-size-4 mb-4">Pizza pizza</div>
        {children}
    </div>
}

const PizzaSelector = Selector('Pizza')({
    name: true,
    description: true,
    ingredients: {
        name: true
    },
    price: true,
})

type PizzaType = FromSelector<typeof PizzaSelector,'Pizza'>

const Pizza: React.FC<PizzaType> = ({ name, ingredients, price,description }) => {
    return <div className="box">
        <div className="block"><strong className="mr-4">{name}</strong><i>{new Intl.NumberFormat('de-DE', { style: 'currency', currency: 'EUR' }).format(price)}</i></div>
        <div className="block">{description}</div>
        <div className="tags">
            {ingredients.map(i => <div className="tag">{i.name}</div>)}
        </div>
    </div>
}

export const data = async () => {
    const queryFetch = Gql("query")
    const result = await queryFetch({
        menu: {
            pizzas: PizzaSelector
        }
    })
    return result.menu.pizzas
}


type DataType = ReturnType<typeof data> extends Promise<infer R> ? R : ReturnType<typeof data>

export default (props: DataType) => {
    return <MainComponent>{props.map(Pizza)}</MainComponent>
}
```

JS Playground is driven by GraphQL Zeus:

{% embed url="<https://github.com/graphql-editor/graphql-zeus>" %}

Zeus is a GraphQL client for Javascript and TypeScript. For more information read the [GraphQL Zeus readme](https://github.com/graphql-editor/graphql-zeus/blob/master/README.md) on GitHub.

After changing the JS code, update it by clicking the play button or by Cmd/Crtl + S to see the results in the preview window on the right.

### Preview and download&#x20;

Additionally we added a few ways to display and export the result of your work:

* by clicking the **eye button**, you can preview the mock front end in a new tab
* **Export zipped static site** will download all of your mock front-end as JSON, CSS, and JS files in one zip folder


# Github Sync

Synchronize GraphQL Editor content with your GitHub repository

To connect GraphQL Editor with GitHub you need to authorize the GraphQL Editor app so it can make PRs on your behalf. You can do this:

* During the project creation process
* In **Graph** view by clicking the GitHub icon

### Schema Sync

You can both load and commit GraphQL schema to your repository

### File Sync

You can sync files from every category to your GitHub Repository. This will sync the whole folder for: **Explorer**, **GraphiQL**, **Tests** and **Microservices**.

### **Features**

#### Choose a branch

To choose a branch start writing its name to get autocomplete suggestions

#### **Browse commits**

To choose a commit start typing its hash or the message it contains


# Troubleshooting

Help in errors


# CLI

## GraphQL Editor CLI

Make your GraphQL schema your one and only source of truth by translating it to literally anything. The main goal is to provide an interactive experience creating GraphQL as a service. Our CLI is compatible with GraphQL editor projects (both free and paid tiers).

### Installation

#### Global

```
npm i -g graphql-editor-cli
```

#### Inside Repo

```
npm i -D graphql-editor-cli
```

then use with (for example) npx or as a `package.json` script

### Usage

All commands work in 3 ways:

* you can provide all arguments with flags
* you can get the arguments from a local config file
* you can complete the arguments in interactive modes

####


# Schema

Download your GraphQL Editor schema to output directory

Fetch schema from a GraphQL Editor project. Schema will be compiled with all the GraphQL libraries you are using for this project.

### Additional options

* schemaDir: String schema directory


# Create a microservice project

How to create backend from a GraphQL Editor project

```
npx graphql-editor-cli create backend
```

The above command will ask you interactively for your namespace and project inside GraphQL Editor. After that, it will create a project in a folder with the project name. It will also attach:

* stucco backend
* schema
* typings for resolvers
* package.json
* eslint
* prettier

This will let you jumpstart your backend project.&#x20;


# Development

Run TS & Stucco server

To start development with a live GraphQL server inside your project directory run the command:

```shell
npx gecli dev
```

This will start the live GraphQL server & re-compile TypeScript and will restart the GraphQL server on each change.


# Cloud


# Local server

Local server for cloud files

When you have a microservice in the cloud with or without GraphQL Editor backend, you can run a local GraphQL server for your microservice by using the following command:

```
npx gecli cloud server
```

This command will

1. Download your files from GraphQL Editor Cloud to a temporary folder
2. Install packages inside the folder
3. Run `stucco` server and typescript server inside that folder

This command will also react to the changes made inside GraphQL Editor.&#x20;

This is simply the fastest way to spin a local server for your no-code GraphQL Editor system.


# Deploy

Deploy Microservices via CLI and CI templates

Inspired by frontend deployment platforms we have focused on creating an easy experience. To deploy your backend code to our shared workers you need call:<br>

```
npx graphql-editor-cli deploy
```

It will trigger the deployment to serverless GraphQL functions and additionally provide logs for this deployment.


# Gitlab CI

How to setup Gitlab CI with GraphQL Editor Shared worker deployment

{% hint style="info" %}
To get GRAPHQL\_*EDITOR\_TOKEN variable run the **token** command*
{% endhint %}

```yaml
image: node:14

stages:
  - deploy

deploy:
  only:
    - main
  stage: deploy
  variables:
    GRAPHQL_EDITOR_TOKEN: $GRAPHQL_EDITOR_TOKEN
  script:
    - npm i
    - |
      npx graphql-editor-cli deploy \
      -e SECRET_VALUE=$SECRET_VALUE 

```


# Github Actions

How to setup Github Actions with GraphQL Editor Shared worker deployment

{% hint style="info" %}
To get GRAPHQL\_*EDITOR\_TOKEN variable run the **token** command*
{% endhint %}

```yaml
on:
  push:
    branches:
      - main
jobs:
  build:
    runs-on: ubuntu-latest
    environment: development
    steps:
      - uses: actions/checkout@v2
      - uses: actions/setup-node@v2
        with:
          node-version: '14.x'
          registry-url: 'https://registry.npmjs.org'
      - run: npm install
      - run: >
          npx gecli deploy 
            -e SECRET_VALUE=$SECRET_VALUE 
            -e GRAPHQL_EDITOR_TOKEN=$GRAPHQL_EDITOR_TOKEN 
        env:
          SECRET_VALUE: ${{secrets.SECRET_VALUE}}
          GRAPHQL_EDITOR_TOKEN: ${{secrets.GRAPHQL_EDITOR_TOKEN}}
```


# Push/Pull

Push changes to GraphQL Editor Cloud or pull the project to a repo

### **Push**

Sometimes you might want to push to cloud GraphQL Editor back from the repo, so that editor users can see/test the changes in the Editor browser IDE. To do so use this command:

```
$ gecli cloud push
```

This will clean the cloud folder and push cwd to the editor cloud.

### **Pull**

You might want to move from the cloud folder if your service is getting bigger and put the project inside a repository. To do so you can use the pull command:

```
$ gecli cloud pull
```

It will pull the project to the project name folder.


# Get the CI token

For actions like deployment, you will need an access token. To get it run a command:

```shell
$ gecli token
```

You will be asked to confirm the code from the browser and then the token will be copied to clipboard.


# Code Generation


# TypeScript Typings

Export typings from your project

Generate TypeScript typings from your GraphQL Editor project.

```
$ gecli codegen typings
```

**Additional options**

| Option      | type               | description                                 |
| ----------- | ------------------ | ------------------------------------------- |
| typingsDir  | string             | Path where to store generated typings files |
| typingsEnv  | "browser" or "node | Environment for typings to work with        |
| typingsHost | string             | GraphQL Server URL                          |


# Resolvers

How to specify resolvers in a repo

To specify resolvers in a repo use the CLI to add those with a command or manually edit the stucco.json file.

### Adding a resolver

```
npx gecli resolver
```

This above command will interactively ask you about what resolver code you want to create.

### Adding manually

Given that the `schema.graphql` in your repository looks something like this:

{% code title="schema.graphql" %}

```graphql
type Query{
    hello: String!
}

schema {
    query: Query
}
```

{% endcode %}

You can specify the resolver as follows. As you see the `name` is the path to a generated or `js` file.

{% code title="stucco.json" %}

```javascript
{
    "resolvers": {
        "Query.bundle": {
            "resolve": {
                "name": "lib/Query/hello"
            }
        }
    }
}
```

{% endcode %}

{% code title="hello.js" %}

```typescript
export const handler = () => "world"
```

{% endcode %}


# Model Types

Generate model types for popular databases like MongoDB

```bash
$ gecli codegen models
```

Generate TypeScript Models from GraphQL types. They are very handy to use with popular databases.

```graphql
type Person {
  firstName: String!
  lastName: String!
  email: String
  phone: String
  friends: [Person!]!
}
```

will be transformed to a model file

```typescript
import type { ModelTypes } from '@/zeus';
export type Person = ModelTypes['Person'];
```

later on you may want to transform it so that it is a database model

```typescript
import type { ModelTypes } from '@/zeus';
export type Person = Omit<ModelTypes['Person'], 'friends'> & {
  friends: string[];
};
```

You can see the concept.

**MongoDB**

Here is an example how you can use your model in MongoDB:

```typescript
db.collection<MyModel>.find({})
```


# Integrations

Some cool No-Code integrations that live inside the GraphQL Editor ecosystem

Both installation and development of the GraphQL Editor integrations is possible. Integrations are small pieces of code that are reusable inside the GraphQL Editor Resolvers system.


# Installation

Use GraphQL Editor Integrations in your backend projects

Installation is done via GraphQL Editor or by just using an npm package name and providing a resolver path to the node\_modules path. The other way is to simply install it via GraphQL Editor:

{% code title="package.json" %}

```json
{
  "dependencies": {
    "gei-crud": "0.0.2"
  }
}
```

{% endcode %}

{% code title="stucco.json" %}

```json
{
  "resolvers": {
    "Query.objects": {
      "resolve": {
        "name": "node_modules/gei-crud/lib/Query/objects"
      },
      "data": {
        "model": {
          "value": "Pizza"
        }
      }
    }
  }
}
```

{% endcode %}


# Develop your integrations

Create your own no-code integrations

**Development**

To develop a GraphQL Editor Integration use the `gecli create backend` command to create your project. Then initialize the integration.

**Data format**

{% code title="integration.ts" %}

```typescript
type IntegrationData = {
  name: string;
  description: string;
  value: string | string[];
  required?: boolean;
};

type IntegrationSpecification = {
  [resolver: string]: {
    name: string;
    description: string;
    data: Record<string, IntegrationData>;
    resolve: { name: string };
  };
};
const integration: IntegrationSpecification = {
  'Query.objects': {
    name: 'List objects',
    description: 'List objects stored in database',
    data: {
      model: {
        name: 'Database model',
        description: 'Specify model name',
        value: 'Object',
        required: true,
      },
      sourceFilterParameters,
    },
    resolve: {
      name: 'lib/Query/objects',
    },
  },
};
```

{% endcode %}

Later on use the `gecli gei integrate` command to integrate your TypeScript file to the `stucco.json`

**Init**

Init files needed to create the integration from your backend project to be used in GraphQL Editor No-Code editor or as npm package.

**Integrate**

Integrate your files with the project's `stucco.json`

**Publish**

Publish your integration to GraphQL Editor for use in the GraphQL Editor No-Code editor.

**Unpublish**

Unpublish your integration from GraphQL Editor.


# Stucco JS

Schema first GraphQL Server Library

### About

Stucco-js is a JavaScript/TypeScript runtime for Stucco. It can be used as a local development environment or as a base library for implementing a FaaS runtime.

### Configuration file

`Stucco-js` relies on the [Stucco](https://github.com/graphql-editor/stucco) library written in GoLang. The configuration file format is in JSON.

#### Resolvers

```json
{
    "resolvers":{
        "RESOLVER_TYPE.RESOLVER_FIELD":{
            "resolve":{
                "name": "PATH_TO_RESOLVER"
            }
        }
    }
}
```

**Using TypeScript**

If you have your TypeScript files in the src folder you should transpile them to the lib folder and Stucco can run it from there.

### Local development

To start local development you need a folder with: `stucco.json`, `schema.graphql` and a file with resolvers in the root folder. To fetch your schema from the URL you can use a tool like [GraphQL-Zeus](https://github.com/graphql-editor/graphql-zeus).

Add this script to your package json to test your backend:

```
{
    "scripts":{
        "start": "stucco"
    }
}
```

or simply run with npx via:

```
$ npx stucco
```


# Resolvers

GraphQL Field resolvers

Resolvers are files or named exports.&#x20;

#### Default export

```typescript
export default (input) => {
    return  "Hello world"
}
```

#### Handler export

```typescript
export const handler = (input) => {
    return "Hello world"
}
```

#### Named export

```typescript
export const (input) => {
    return "Hello world"
}
```

```json
{
    "resolvers":{
        "RESOLVER_TYPE.RESOLVER_FIELD":{
            "resolve":{
                "name": "PATH_TO_RESOLVER.someName"
            }
        }
    }
}
```

#### Passing arguments to another resolver:

**Resolver "Query.todoOperations"**

{% code title="schema.graphql" %}

```graphql
type TodoOperations{
    getCreditCardNumber(id: String!): String
    showMeTehMoney: Int
}

type Query{
    todoOps: TodoOperations
}
```

{% endcode %}

{% code title="stucco.json" %}

```json
{
    "resolvers":{
        "Query.todoOps":{
            "resolve":{
                "name": "lib/todoOps"
            }
        },
        "TopoOps.getCreditCardNumber":{
            "resolve":{
                "name": "lib/getCreditCardNumber"
            }
        }
    }
}
```

{% endcode %}

{% code title="lib/todoOps.js" %}

```typescript
export default (input) => {
    return {
        creditCards:{
            dupa: "1234-1234-1234-1234",
            ddd: "1222-3332-3323-1233"
        }
    }
}
```

{% endcode %}

{% code title="lib/getCreditCardNumber.js" %}

```typescript
export default (input) => {
    const { id } = input.arguments
    return {
        response: input.source.creditCards[id]
    }
}
```

{% endcode %}

###

###


# Custom Scalars

How to write resolvers for custom scalars

Scalars used in your schema can be returned after being processed by a custom resolver function first. This is optional and by default, they are returned without a type check.

```json
{
    "scalars":{
        "CUSTOM_SCALAR_NAME":{
            "parse":{
                "name": "PATH_TO_RESOLVER"
            },
            "serialize":{
                "name": "PATH_TO_RESOLVER"
            }
        }
    }
}
```


# Examples

StuccoJS Examples

This example shows a simple GraphQL schema with one string field resolver:

{% code title="schema.graphql" %}

```graphql
type Query{
    hello: String
}
schema{
    query: Query
}
```

{% endcode %}

{% code title="stucco.json" %}

```json
{
    "resolvers":{
        "Query.hello":{
            "resolve":{
                "name": "lib/hello"
            }
        }
    }
}
```

{% endcode %}

{% code title="hello.js" %}

```typescript
export function handler(input){
    return "Hello world"
}
```

{% endcode %}

When the following query is executed:

<pre class="language-graphql" data-title="GraphQL query"><code class="lang-graphql"><strong>{
</strong>    hello
}
</code></pre>

It should yield this response:

{% code title="Response" %}

```json
{
    "hello": "Hello world"
}
```

{% endcode %}


# GraphQL Zeus

Strongly Typed GraphQL from the [GraphQL Editor](https://graphqleditor.com/?utm_source=graphql_zeus_github) team.

GraphQL Zeus is simply the best way to interact with your GraphQL endpoints in a type-safe way. Zeus uses your schema to generate Typescript types and strongly typed clients to unlock the power, efficiency, productivity and safety of Typescript on your GraphQL requests.

## Features:

⚡️ Types mapped from your schema\
⚡️ Works with Apollo Client, React Query, Stucco Subscriptions *(\*more coming soon...)*\
⚡️ Works with Subscriptions\
⚡️ Infer complex response types\
⚡️ Create reusable selection sets (like fragments) for use across multiple queries\
⚡️ Supports GraphQL Unions, Interfaces, Aliases and Variables\
⚡️ Handles even absolutely **massive** schemas\
⚡️ Supports Browsers, Node.js and React Native in Javascript and Typescript\
⚡️ Schema downloader\
⚡️ JSON schema generation<br>

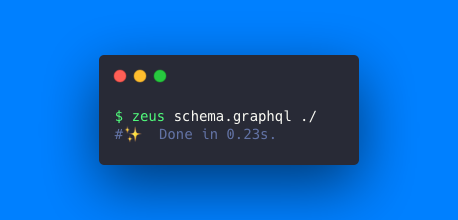
## Generate Types With Zeus CLI

Simply run Zeus in your terminal to output your types file based on your graphql schema:

<figure><img src="/files/OsMpMVIa6DwCz2qoBIeM" alt=""><figcaption></figcaption></figure>

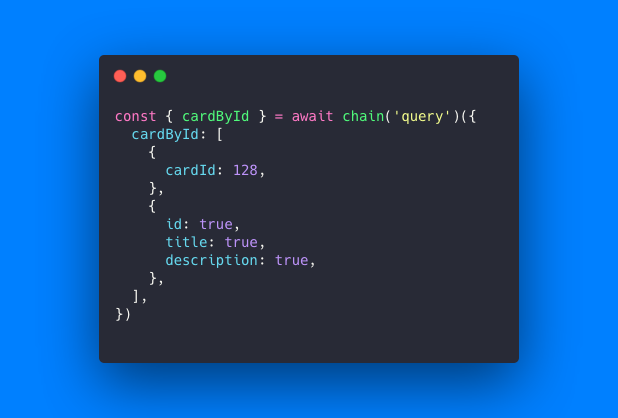
## Usage Example

A simple example of using a generated `chain` client. Queries, mutations and subscriptions are now type-safe in arguments, field selections and response types:

<figure><img src="/files/7O5WmgukE1YIRJrkSueL" alt=""><figcaption></figcaption></figure>


# Basics


# Getting Started

### Getting Started

Use the Zeus CLI to generate types and GraphQL clients based on your schema, which you can then import into your projects to autocomplete, query and use GraphQL responses in a type-safe way.

### Quick Start

#### Installation

```
$ npm i -g graphql-zeus
# OR
# yarn global add graphql-zeus
```

You can also install locally to a project and then use as a npm or yarn script command or with `npx` or `yarn` directly eg:

```
$ npx zeus schema.graphql ./
# OR
# yarn zeus schema.graphql ./
```

#### TypeScript

Zeus is Typescript native, you can refer to imported types directly from the generated output of the CLI:

```
$ zeus schema.graphql ./
```

### Demo Endpoint

All the demo code here was made using the demo GraphQL endpoint of [Olympus Cards](https://app.graphqleditor.com/a-team/olympus) built with [GraphQL Editor](https://graphqleditor.com/). Feel free to check out the [GraphiQL interface](https://faker.graphqleditor.com/a-team/olympus/graphql) too.

### Query With Zeus Chain Client

You can now use the Zeus `Chain` client from the generated output to make type-safe queries and mutations to your endpoint and receive type-safe responses.

```ts
import { Chain } from './zeus';

// Create a Chain client instance with the endpoint
const chain = Chain('https://faker.graphqleditor.com/a-team/olympus/graphql');

// Query the endpoint with Typescript autocomplete for arguments and response fields
const listCardsAndDraw = await chain('query')({
  cardById: [
    {
      cardId: 'da21ce0a-40a0-43ba-85c2-6eec2bf1ae21',
    },
    {
      name: true,
      description: true,
    },
  ],
  listCards: {
    name: true,
    skills: true,
    attack: [
      { cardID: ['66c1af53-7d5e-4d89-94b5-1ebf593508f6', 'fc0e5757-4d8a-4f6a-a23b-356ce167f873'] },
      {
        name: true,
      },
    ],
  },
  drawCard: {
    name: true,
    skills: true,
    Attack: true,
  },
});
// listCardsAndDraw is now typed as the response of the query.
```

When querying a GraphQL field which takes an argument such as the `cardById` above, the fields are defined in terms of a tuple. For example for cardById: `[ {...arguments} , {...response_selection_set} ]` the equivalent in gql syntax would be:

```
cardById (cardId: "da21ce0a-40a0-43ba-85c2-6eec2bf1ae21") {
  name
  description
}
```

For fields which have no argument, those receive only the response selection set object values.

Note: `Chain` will also accept a second argument of fetch-like options to configure the client with properties such as `credentials`, `mode`, `headers` etc...

Note: There is also an exported Zeus `Gql` convenience function, it is a Chain client pre-configured with the endpoint specified in the CLI.

### Listen on a WebSocket - GraphQL Subscriptions

Use the Zeus `Subscription` client creator in your generated output to create WebSocket connections to your GraphQL socket.

```ts
import { Subscription } from './zeus';

// Create a Subscription client instance with the endpoint
const sub = Subscription('https://faker.graphqleditor.com/a-team/olympus/graphql');

// Call the client instance and listen for responses
sub('subscription')({
  deck: {
    id: true,
  },
}).on((response) => {
  console.log(response.deck);
});
```

[Read more about subscriptions](/tools/index/index/subscriptions)

### Usage with NodeJS

Generate clients for use with Node.js:

```
$ zeus schema.graphql ./  --node
```

### Usage with React Native

As usual:

```
$ zeus schema.graphql ./
```

### Other CLI Options

Specify the output folder with the second argument:

```
$ zeus schema.graphql ./generated
```

Output Typescript Only with the `--typescript` flag:

```
$ zeus schema.graphql ./ --typescript
```

Load your schema from a URL with a URL in the first argument:

```
$ zeus https://faker.graphqleditor.com/a-team/olympus/graphql ./
```

Download and save GraphQL schema to a local path with the `--graphql=savePath` flag:

```
$ zeus https://faker.graphqleditor.com/a-team/olympus/graphql ./ --graphql=generated
```

Generate and save a JSON schema to a local path with the `--jsonSchema=savePath` flag:

```
$ zeus https://faker.graphqleditor.com/a-team/olympus/graphql ./ --graphql=generated
```

Add a header value with the `--header=value` flag:

```
$ zeus https://faker.graphqleditor.com/a-team/olympus/graphql ./ --header=Authorization:myNiceAuthHeader
```

Get help with the Zeus CLI by using:

```
$ zeus help
```

#### Tip:

Add a script entry in your `package.json` file for quickly calling Zeus generation:

```json
"scripts": {
//...
"generate": "zeus https://faker.graphqleditor.com/a-team/olympus/graphql zeusGenerated --typescript --header='My-Auth-Secret:JsercjjJY5MmghtHww6UF' --apollo"
},
```


# Selectors

### Generate Reusable Selection Sets

In TypeScript Zeus can help make type-safe Zeus selection sets to reuse across queries.

```typescript
import { Selector, Chain } from './zeus';

const chain = Chain('https://faker.graphqleditor.com/a-team/olympus/graphql');

const cardSelector = Selector('Card')({
  name: true,
  description: true,
  Attack: true,
  skills: true,
  Defense: true,
  cardImage: {
    key: true,
    bucket: true,
  },
});

const queryWithSelectionSet = await chain('query')({
  drawCard: cardSelector,
});
```

### Inferring the response type

Sometimes you might want to infer the response type, for that it is best to use selectors:

```tsx
import { Selector, InputType, GraphQLTypes } from './zeus';

export const drawCardQuery = Selector("Query"){
  drawCard: {
    Attack: true,
    Children: true,
    id: true,
  },
});

type InferredResponseType = InputType<GraphQLTypes['Query'], typeof drawCardQuery>;
```


# ES Modules

Due to validity of `.js` imports in TypeScript for ES modules you can use the flag `es` to generate `.js` imports

```
$ zeus schema.graphql ./ --es
```


# Specification

Returned promise of type query data object:

```
PROMISE_RETURNING_OBJECT = Chain.[OPERATION_NAME]({
    ...FUNCTION_FIELD_PARAMS
})(
    ...QUERY_OBJECT
).then ( RESPONSE_OBJECT => RESPONSE_OBJECT[OPERATION_FIELD] )
```

Simple function params object:

```
FUNCTION_FIELD_PARAMS = {
  KEY: VALUE
}
```

Query object:

```
QUERY_OBJECT = {
    ...RETURN_PARAMS
}
```

Return params is an object containing RETURN\_KEY - true if it is a `scalar`, RETURN\_PARAMS for a `type` is otherwise a function where you pass field params and type return params.

```
RETURN_PARAMS = {
    RETURN_KEY: true,
    RETURN_KEY: {
        ...RETURN_PARAMS
    },
    RETURN_FUNCTION_KEY:[
        {
            ...FUNCTION_FIELD_PARAMS
        },
        {
            ...RETURN_PARAMS
        }
    ]
}
```

## Use Alias Spec

```
RETURN_PARAMS = {
  __alias: RETURN_PARAMS
}
```

Access aliased operation in a type-safe way

```
PROMISE_RETURNING_OBJECT[ALIAS_STRING]
```


# Use as a library

### Generate Code

This will be rarely used, but here you are! Generate Typescript and Javascript from GraphQL definitions:

```typescript
import { TreeToTS } from 'graphql-zeus';
import { Parser } from 'graphql-js-tree';

const schemaFileContents = `
type Query{
    hello: String!
}
schema{
    query: Query
}
`;

const typeScriptDefinition = TreeToTS.resolveTree(Parser.parse(schemaFileContents));
```

### Dynamically Fetch Schema

This is useful when you need your schema fetched from your GraphQL endpoint in-code:

```typescript
import { Utils } from 'graphql-zeus';

Utils.getFromUrl('https://faker.graphqleditor.com/a-team/olympus/graphql').then((schemaContent) => {
  // Use schema content here
});
```


# JavaScript

To use with JavaScript as an autocomplete tool you need to install TypeScript, run the Zeus CLI, and then transform the result to JS using `tsc`

```
$ npm i -D typescript
# OR
# yarn add -D typescript
```

Generate Zeus:

```
$ zeus schema.graphql ./
```

And transform it using Typescript:

```
$ npx tsc ./zeus/*.ts --declaration --target es5 --skipLibCheck
# OR
# yarn tsc ./zeus/*.ts --declaration --target es5 --skipLibCheck
```

This will generate an `out.d.ts` file so that you can have autocompletion.


# Custom fetch

Zeus `Thunder` gives total control of the fetch function and you won't lose the result type. ⚡️

```typescript
import { Thunder } from './zeus';

// Create thunder fetch client with endpoint, options and response handlers
const thunder = Thunder(async (query) => {
  const response = await fetch('https://faker.graphqleditor.com/a-team/olympus/graphql', {
    body: JSON.stringify({ query }),
    method: 'POST',
    headers: {
      'Content-Type': 'application/json',
    },
  });

  if (!response.ok) {
    return new Promise((resolve, reject) => {
      response
        .text()
        .then((text) => {
          try {
            reject(JSON.parse(text));
          } catch (err) {
            reject(text);
          }
        })
        .catch(reject);
    });
  }

  const json = await response.json();

  return json.data;
});

// Call thunder client with type-safe arguments, fields and get type-safe result type
const listCardsAndDraw = await thunder('query')({
  cardById: [
    {
      cardId: 'sdsd',
    },
    {
      description: true,
    },
  ],
  listCards: {
    name: true,
    skills: true,
    attack: [
      { cardID: ['s', 'sd'] },
      {
        name: true,
      },
    ],
  },
  drawCard: {
    name: true,
    skills: true,
    Attack: true,
  },
});
```


# Subscriptions

Zeus supports [GraphQL over WebSocket subscriptions](https://github.com/enisdenjo/graphql-ws/blob/master/PROTOCOL.md) out-of-the-box and is compatible with many popular GraphQL servers.

Two implementations are supported:

* **graphql-ws**: the modern WebSocket-based transport, implemented by [the graphql-ws package](https://www.npmjs.com/package/graphql-ws). It is also the standard [used by Apollo](https://www.apollographql.com/docs/react/data/subscriptions/#choosing-a-subscription-library)
* **legacy** (default): a transport based on raw WebSockets

## Generating the client

To use [graphql-ws](https://www.npmjs.com/package/graphql-ws) as your subscription transport you'll need to do the following:

```
# Generate the client
zeus schema.gql ./ --subscriptions graphql-ws
# Add graphql-ws to your project's dependencies
npm install graphql-ws
```

If you want to use **legacy**, use `--subscriptions legacy` instead. You may need to install [ws](https://www.npmjs.com/package/ws) depending on your setup.

No matter what implementation you chose, the usage remains the same:

```typescript
// Create a new Subscription with some authentication headers
const wsChain = Subscription('wss://localhost:4000/graphql', {
  get headers() {
    return { Authorization: `Bearer ${getToken()}` };
  },
});

// Subscribe to new messages
wsChain('subscription')({
  message: {
    body: true,
  },
}).on(({ message }) => {
  console.log(message.body);
});
```

If you need to unsubscribe from a subscription (e.g. you are developing as Single Page App), you can do it as follows:

```typescript
// Subscribe to new messages
const onMessage = wsChain('subscription')({
  message: {
    body: true,
  },
});
onMessage.on(({ message }) => {
  console.log(message.body);
});

// Close the underlying connection
onMessage.ws.close();
```

While you may use `wsChain('query')` or `wsChain('mutation')`, [Apollo strongly discourages this practice.](https://www.apollographql.com/docs/react/data/subscriptions/#3-split-communication-by-operation-recommended)


# GraphQL


# Interfaces and Unions

### GraphQL Unions

Here's how you can use Zeus with [GraphQL Unions](https://spec.graphql.org/June2018/#sec-Unions):

```typescript
const { drawChangeCard } = await chain('query')({
  drawChangeCard: {
    __typename: true,
    '...on EffectCard': {
      effectSize: true,
      name: true,
    },
    '...on SpecialCard': {
      effect: true,
      name: true,
    },
  },
});
```

and here's the response:

```json
{
  "effectSize": 195.99532210956377,
  "name": "Destinee",
  "__typename": "EffectCard"
}
```

### GraphQL Interfaces

Zeus also works with [GraphQL Interfaces](http://spec.graphql.org/June2018/#sec-Interfaces)

```typescript
const { nameables } = await Gql('query')({
  nameables: {
    __typename: true,
    name: true,
    '...on CardStack': {
      cards: {
        Defense: true,
      },
    },
    '...on Card': {
      Attack: true,
    },
  },
});
```

and the response:

```json
{
  "nameables": [
    {
      "__typename": "EffectCard",
      "name": "Hector"
    },
    {
      "__typename": "CardStack",
      "name": "Scotty",
      "cards": [
        {
          "Defense": 1950
        },
        {
          "Defense": 76566
        }
      ]
    },
    {
      "__typename": "SpecialCard",
      "name": "Itzel"
    }
  ]
}
```


# Variables

Performing queries with variables is as simple as using the `useZeusVariables` function. It also forces you to be type-safe:

```typescript
import { Gql, $ } from './zeus';

const addCardResult = await Gql('mutation')(
  {
    addCard: [
      {
        card: $('card'),
      },
      {
        id: true,
        description: true,
        name: true,
        Attack: true,
        skills: true,
        Children: true,
        Defense: true,
        cardImage: {
          bucket: true,
          region: true,
          key: true,
        },
      },
    ],
  },
  {
    variables: {
      Attack: 2,
      Defense: 3,
      description: 'Lord of the mountains',
      name: 'Golrog',
    },
  },
);
```

## TypedDocumentNode + Apollo Client useMutation examples

The following example demonstrates usage with Apollo. Other clients should work similarly.

```tsx
import { typedGql } from './zeus/typedDocumentNode';
import { $ } from './zeus';
import { useMutation } from '@apollo/client';

const myMutation = typedGql('mutation')({
  cardById: [{ cardId: $('cardId', 'String!') }, { name: true }],
});

const Main = () => {
  const [mutate] = useMutation(myMutation);
  // data response is typed
  return (
    <div
      onClick={() => {
        // this are typesafe vars
        mutate({
          variables: {
            cardId: 'du1hn298u1eh',
          },
        });
      }}
    >
      Click
    </div>
  );
};
```


# Aliases

Zeus also supports declaring aliases 🥸

```graphql
const aliasedQueryExecute = await chain('query')({
  listCards: {
    __alias: {
      atak: {
        attack: [
          { cardID: ['1'] },
          {
            name: true,
            description: true,
          },
        ],
      },
    },
  },
});
```

and here's the response:

```json
{
  "listCards": [
    {
      "atak": [
        {
          "name": "Zelma",
          "description": "Central"
        }
      ]
    }
  ]
}
```

Now you can access properties in a type-safe way by using:

```javascript
aliasedQueryExecute.listCards.map((c) => c.atak);
```


# Generate Gql

Use the `Zeus` function to generate a gql string:

```typescript
import { Zeus } from './zeus';

const stringGql = Zeus('query', {
  listCards: {
    name: true,
    skills: true,
    Attack: true,
  },
});

// stringGql value:
// query{listCards{name skills Attack}}
```


# Directives

Zeus also supports using directives on fields:

```typescript
import { Chain } from './zeupypes';

// Create a Chain client instance with the endpoint
const chain = Chain('https://faker.graphqleditor.com/a-team/olympus/graphql');

// Query the endpoint with Typescript autocomplete for arguments and response fields
const listCardsAndDraw = await chain('query')({
  drawCard: {
    name: true,
    skills: true,
    Attack: `@skip(if: true)`,
  },
});
```

Remember you need to put full string instead of `true`.

## Use on object field

Here's how to use directive on `drawCard`:

```typescript
import { Chain } from './zeus';

// Create a Chain client instance with the endpoint
const chain = Chain('https://faker.graphqleditor.com/a-team/olympus/graphql');

// Query the endpoint with Typescript autocomplete for arguments and response fields
const listCardsAndDraw = await chain('query')({
  drawCard: {
    __directives: `@skip(if:true)`,
    name: true,
    skills: true,
  },
});
```

## Use on function

```typescript
import { Chain } from './zeus';

// Create a Chain client instance with the endpoint
const chain = Chain('https://faker.graphqleditor.com/a-team/olympus/graphql');

// Query the endpoint with Typescript autocomplete for arguments and response fields
const listCardsAndDraw = await chain('query')({
  drawCard: {
    name: true,
    skills: true,
    attack:[
      {
        cardId:['2312321']
      },
      {
        __directives: `@skip(if:true)`,
        name: true,
        skills: true,
      }
    ]
  }
});
```

## Use it with variables

```typescript
import { Chain } from './zeus';

// Create a Chain client instance with the endpoint
const chain = Chain('https://faker.graphqleditor.com/a-team/olympus/graphql');
const variables = useZeusVariables({
    isDefense: 'Boolean!'
})({
    isDefense:true
});
const { $ } = variables;
// Query the endpoint with Typescript autocomplete for arguments and response fields
const listCardsAndDraw = await chain('query')({
  drawCard: {
    name: true,
    skills: true,
    Attack: `@skip(if: ${$('isDefense')})`,
  },
  {
      variables
  }
});
```


# Scalars

### Scalars

In Zeus you can encode and decode scalars.

#### Decode

The decode function is called every time a scalar returns from backend before passing the result from Chain, Subscription functions

```graphql
scalar JSON
scalar Datetime
type Card{
    info: JSON!
    createdAt: Datetime
}
type Query:{
    drawCard: Card!
}
```

```typescript
import { Chain } from './zeus';

// Create a Chain client instance with the endpoint
const chain = Chain('https://faker.graphqleditor.com/a-team/olympus/graphql');

// Query the endpoint with Typescript autocomplete for arguments and response fields
const data = await chain('query', {
  scalars: {
    JSON: {
      encode: (e: unknown) => JSON.stringify(e),
      decode: (e: unknown) => JSON.parse(e as string),
    },
    Datetime: {
      decode: (e: unknown) => new Date(e as string),
      encode: (e: unknown) => (e as Date).toISOString(),
    },
  },
})({
  drawCard: {
    info: true,
  },
});
```

So the `data.drawCard.info` will be of type `Date` as provided by decoder `ReturnType`

#### Encode Scalars

You can also encode scalars before sending them to backend:

```typescript
import { Chain } from './zeus';

// Create a Chain client instance with the endpoint
const chain = Chain('https://faker.graphqleditor.com/a-team/olympus/graphql');

// Query the endpoint with Typescript autocomplete for arguments and response fields
const listCardsAndDraw = await chain('query', {
  scalars: {
    JSON: {
      encode: (e: unknown) => JSON.stringify(e),
      decode: (e: unknown) => JSON.parse(e as string),
    },
    Datetime: {
      decode: (e: unknown) => new Date(e as string),
      encode: (e: unknown) => (e as Date).toISOString(),
    },
  },
})({
  drawCard: {
    info: true,
  },
});
```

Encoders require value to be encoded to string and don't work with variables yet.

### Place decoders and encoders in one place for reuse

```typescript
import { Chain, ZeusScalars } from './zeus';

// Create a Chain client instance with the endpoint
const chain = Chain('https://faker.graphqleditor.com/a-team/olympus/graphql');
const scalars = ZeusScalars({
  JSON: {
    encode: (e: unknown) => JSON.stringify(e),
    decode: (e: unknown) => JSON.parse(e as string),
  },
  Datetime: {
    decode: (e: unknown) => new Date(e as string),
    encode: (e: unknown) => (e as Date).toISOString(),
  },
});

// Query the endpoint with Typescript autocomplete for arguments and response fields
const listCardsAndDraw = await chain('query', {
  scalars,
})({
  drawCard: {
    info: true,
  },
});
```


# Examples


# Forms

To use GraphQL Zeus with forms you should make use of its generated Value Types. When submitting a form using a mutation it is much easier and type-safe to do it using `ValueTypes`.

Here's an example schema:

```graphql
type Mutation {
  createUser(user: CreateUser!): String
}

input CreateUser {
  firstName: String!
  lastName: String!
  age: Int
  username: String!
}
```

You can use `ValueTypes['CreateUser']` as params for submit form function

```typescript
const submitForm = (values: ValueTypes['CreateUser']) => {
  // ..,rest of the code, validation
  return Chain('https://yourschemaurl.com/graphql', {
    headers: {
      Authorization: 'yourtoken',
    },
  })('mutation')({
    createUser: [{ user: values }, true],
  });
};
```


# React state

When a query returns an object and you want to store it in React State, you can use GraphQL Zeus to have 100% type-safe objects in your state.

Here's an example schema:

```graphql
type Query {
  listUsers: [User!]
}

type User {
  createdAt: String!
  firstName: String!
  lastName: String!
  age: Int
  username: String!
  id: String!
}
```

You can use Zeus types to get the type of the objects received from a GraphQL Backend

```tsx
import React, { useState } from 'react';
import { GraphQLTypes, InputType, Selector, Chain } from './zeus';

const userSelector = Selector('User')({
  createdAt: true,
  firstName: true,
  lastName: true,
  id: true,
});

type StoredUser = InputType<GraphQLTypes['User'], typeof userSelector>

const getFullName = (u:StoredUser) => u.firstName + ' ' + u.lastName

export const UsersList: React.FC = () => {
  const [users, setUsers] = useState<Array<StoredUser>>([]);

  useEffect(()=>{
      Chain('https://yourschemaurl.com/graphql', {})('query')({
        listUsers: userSelector
      }).then( response => {
        // 100% type-safe
        setUsers(response.data)
      })
    };
  },[])

  return (
    <div>
      {users.map((u) => (
        <div key={u.id} className="flex items-center">
          <div className="font-bold p-4 flex-1">{getFullName(u)}</div>
          <div className="p-4">{u.createdAt}</div>
        </div>
      ))}
    </div>
  );
};
```


# Plugins


# Typed Document Node

```
npm i @graphql-codegen/typed-document-node
```

Zeus can generate builders for [`TypedDocumentNode`](https://www.graphql-code-generator.com/plugins/typed-document-node), a type-safe query representation understood by most GraphQL clients (including Apollo, URQL etc) by adding the `--typedDocumentNode` or `--td` flag to the CLI.

## Generate Type-Safe Zeus Schema And TypedDocumentNode query builders

```
$ zeus https://yourschema.com/graphql ./  --typedDocumentNode
# typedDocumentNode.ts file with typed document node builders is now in the output destination
```

## TypedDocumentNode + Apollo Client useMutation examples

The following example demonstrates usage with Apollo. Other clients should work similarly.

```tsx
import { typedGql } from './zeus/typedDocumentNode';
import { $ } from './zeus';
import { useMutation } from '@apollo/client';

const myMutation = typedGql('mutation')({
  cardById: [{ cardId: $('cardId', 'String!') }, { name: true }],
});

const Main = () => {
  const [mutate] = useMutation(myMutation);
  // data response is typed
  return (
    <div
      onClick={() => {
        // this are typesafe vars
        mutate({
          variables: {
            cardId: 'du1hn298u1eh',
          },
        });
      }}
    >
      Click
    </div>
  );
};
```


# Apollo

From Zeus version 5.1.3 onwards Apollo should be used with graphql-typed-document-node

```
npm i @graphql-codegen/typed-document-node
```

## Generate Type-Safe Zeus Schema And Apollo Client Type-Safe Hooks

```
$ zeus schema.graphql ./  --typedDocumentNode
# apollo.ts file with typed hooks is now in the output destination
```

## TypedDocumentNode + Apollo Client useMutation examples

The following example demonstrates usage with Apollo. Other clients should work similarly.

```tsx
import { typedGql } from './zeus/typedDocumentNode';
import { $ } from './zeus';
import { useMutation } from '@apollo/client';

const myMutation = typedGql('mutation')({
  cardById: [{ cardId: $('cardId', 'String!') }, { name: true }],
});

const Main = () => {
  const [mutate] = useMutation(myMutation);
  // data response is typed
  return (
    <div
      onClick={() => {
        // this are typesafe vars
        mutate({
          variables: {
            cardId: 'du1hn298u1eh',
          },
        });
      }}
    >
      Click
    </div>
  );
};
```


# StuccoJS Subscriptions

Zeus can generate types for the Stucco Subscription library by adding the `--stuccoSubscriptions` flag to the CLI. All types in `data` are then inherited from the Zeus query.

```
$ zeus schema.graphql ./  --stuccoSubscriptions
```

```typescript
stuccoSubscriptions(
  (apiFetchResult) => [apiFetchResult.url],
  'https://my.backend/graphql',
)({ drawCard: { Attack: true } }).on((args) => args.drawCard.Attack);
```


# React Query

Zeus can generate type-safe versions of React queries `useQuery`, `useMutation` etc. and React hooks as `useTypedQuery`, `useTypedMutation` etc. by simply adding the `--reactQuery` flag to the CLI. All types `data` responses are then inherited from the Zeus query. 🚀

```bash
$ zeus schema.graphql ./  --reactQuery
```

```tsx
import { useTypedQuery } from './zeus/reactQuery';

const Main = () => {
  const { data } = useTypedQuery({
    // Get autocomplete here:
    drawCard: {
      name: true,
    },
  });
  // data response is now typed
  return <div>{data.drawCard.name}</div>;
};
```